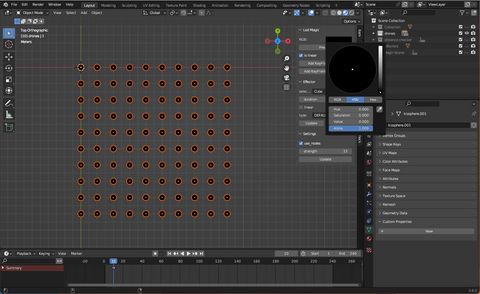
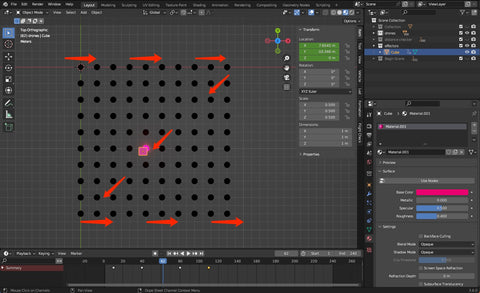
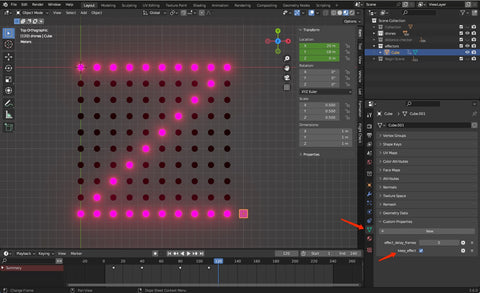
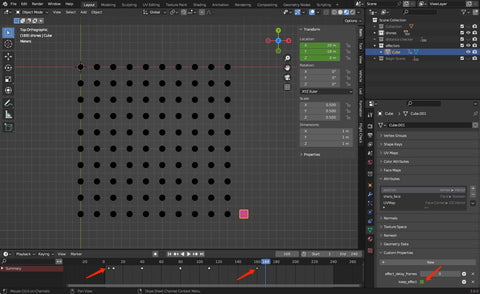
Pay Attention:
]]>
Before the update, please set up the router and the RTK base. Connected to router's Wi-Fi of your computer. Open the GCS and wait for the connect with the RTK base. You could do this work indoor.
]]>
We release a new function of Vimdrones Designer - Auto Resign Lock Selected. This enables partial object locking when paths are Auto assigned.
Video Link:
Tutorial:
Copy from the current formation
Please select the empties of New Formation that you don't want to move. Click the Lock Selected button.
💡 Tips:
Click the window and cancel the selected. Click the Show selected Items for check.
Select the empties that you don't want to Lock, please click the Clear Lock button.
Then in the Vertex Formation, click Append button. Only the vertex without lock will make the transfer.
Finish the transfer of the Begin and Append the drones in the New Formation
💡 Tips:
The empties number without lock should be the same as the assign vertex number of the new material object(s).
]]>
Before the update, please set up the router and the RTK base. Connected to router's Wi-Fi of your computer. Open the GCS and wait for the connect with the RTK base. You could do this work indoor.
Note: need version GCS 3.1.3 or above.
]]>When installing Vimdrones GCS for the first time, please allow Vimdrones GCS through firewall. If you choose not allowed, GCS cannot properly connect to the server.
Please follow these steps:
Open Windows Security.
Click on Firewall & network protection.
Click the Allow an app through firewall option.
Click the Change settings button.
Check vimdrones gcs.exe to allow through the firewall.
Check on Private and Public access the network.
Click the OK button.
Quick tip: If Vimdrones GCS isn’t on the list, click the Allow another app button to locate the Vimdrones GCS
Turn off the Private network and Public network.
We suggest you using use the Method I.
]]>If your router couldn’t connect to internet. Please use these steps:
Connect to the WiFi of the Router for Vimdrones. Open http://router.asus.com or 192.168.50.1 Input the account and Password( in the WiFi Setting Doc)
Click WAN. Choose WAN Connection Type to Automatic IP. Click Apply button.
💡 Tips: You can change the language in the upper right corner.
]]>Please set up the RTK base and the router system indoors. Keep RTK Base as close to the window as possible so that it can receive some satellite signals.
Open the GCS to check if the RTK base is connected. Then open the drone to check if it is online. You will see the Wifi Channel and Radio Return is On. RTCM has the data 1 Hz. That means the connection of the drone is good.
If all is OK. You could move to the outside to do the flight test.
More details: https://docs.vimdrones.com/setup/#pre-flight-setup-procedure
Please prepare the design file. You could use your own design. If you are not sure whether the design is suitable, please send it to us for inspection. Also, you could use our test file.
Design File: https://drive.google.com/drive/folders/1Q5yDesidjdLAcbS82nPfd62TSSIPymwU?usp=sharing
Charge the batteries before the flight test. The initial state of the battery is 7.6V. It will take 1.5-2h to be fully charged the batteries. A fully charged battery is 8.7V. There is a Battery voltage tester among our accessories. You can use it to measure the voltage of the battery. During the flight, if the battery voltage is lower than 7.2V, the drone will automatically return to the original take-off position (RTL).
More details: https://docs.vimdrones.com/setup/#pre-flight-preparation
After the show is over, please unplug the battery from the drone and store it in a cool place. The battery should be avoided from sunlight and high temperature.
The battery should not be stored in fully charged condition. It is recommended to fully charge the battery before the next flight.
Battery Care Details:https://docs.vimdrones.com/setup/#battery
If you are buying our product for the first time, you do not need to configure any drones. We are already configured.
If you purchase the new drones, please do Radio pair and RC Bind. Generally, we will configure the SD cards to be the same as your previous SSID information.
More details: https://docs.vimdrones.com/gcs/#adding-new-mazzy-star-dronetm-to-the-system